How To Make A Home-Made Propagator
A huge part of learning how to garden organically is being able to sow and grow your own seeds. Often, especially in late winter and early spring, it is important to be able to start seeds off indoors. The germination temperatures required by some seeds mean that you will often have to give them a little extra heat. Propagators are designed to aid seed germination by keeping the planting medium and seeds at a steadier temperature. Both unheated and heated examples are available, some of which can be quite costly to buy. Rather than buying a propagator, why not consider making your own? You can make a range of propagators, from small and simple to something much more sophisticated, and save money when sowing and growing your seeds.
 A Mini Propagator For Windowsill Growing
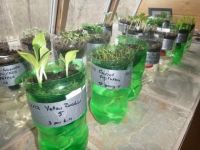
Many seeds will require only a clear covering and a sunny windowsill to germinate. The easiest and simplest way to make a home-made propagator is simply to make use of some of the plastic packaging that comes into your home. One design uses two plastic drinks bottle to make a mini propagator that will fit easily on a sunny windowsill in your home. Cut the bottle in half. Wrap card, paper or dark tape around the bottom half and fill with water. Take the upper half of the bottle. Use a small piece of natural fabric to act as a wick through the hole where the lid was. The fabric will bring water up from this reservoir to the upper bottle section, which you can now place upside down in the reservoir section and fill with your planting medium. Then simply cut the bottom off a second plastic bottle and place over your propagator as a lid.
 A Larger Unheated Propagator
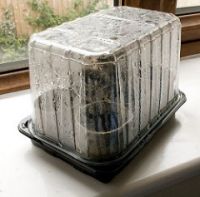
You can also use household rubbish to make a larger tray-style propagator for a greater number of seedlings. Again, you do not need to spend anything on this. You can simply take, for example, the clear plastic trays used to package food items and use these to make simple unheated propagators that can be placed in a warm location inside your home or in a heated greenhouse. Use your imagination and you will find it is unnecessary to buy new plastic lids or propagators when there is so much plastic packaging floating around. You may also be able to source an old window from a junk shop or reclamation year that would be useful placed on top of a sturdy tray for a more permanent propagation solution ( just be careful not to drop the glass).
 A Home-Made Heated Propagator
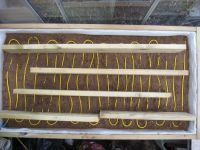
The larger and more sturdy propagator option using a sturdy wooden framed tray and an old glass or recycled plastic cover over the top can also be adapted to make a heated propagator for more delicate plants. You will probably need to buy a soil warming cable and thermostat but you can create the rest yourself using things you may already have lying around and this will still be a much cheaper and more environmentally friendly option than buying a ready-made propagator. First, make a wooden tray using reclaimed wood. For extra thermal properties, line this with polystyrene packaging, should you have some to hand and line with cardboard. Then fill the tray with your a layer of sharp sand, place the soil warming cable and then fill with your growing medium. You can then sow seeds and cover, setting the thermostat to the right temperature for what you want to grow. Only use electric power to heat your propagator when absolutely necessary and where possible, use power from renewable resources.